Select Page

If engines are installed and serviced correctly then most marine engines are very reliable, but they are not infallible and problems are more likely to occur if an engine is not taken care of and inspected from time to time, in addition to carrying out the all important engine servicing. One of the most important parts of the engine to check and service is the fuel system.

Fuel system checks

Regular checks of the fuel system are necessary throughout the year, especially the primary filter of a diesel engine fuel system. With the boat in the boatyard, it is a good opportunity to replace the fuel filters and then bleed the system to remove any air that might have entered the system as a result of replacing the filters. You will need to buy replacement filters as recommended by your engine manufacturer in advance.

Primary filter – this catches any water and dirt that might be in the fuel. Typically, this has a filter beneath which is a sealed glass bowl where dirt and water get trapped. To replace the filter do as follows:

Diesel engine primary filter

  1. Make sure the tank fuel stopcock is closed.
  2. Diesel is harmful to the skin, so wear protective gloves in case of fuel spillage (which is more than likely to occur). Also have some rags or paper towels at hand.
  3. Use a suitable container such as a glass jar or plastic container to catch all the fuel which will drain from the filter and bowl.
  4. Undo the drain screw at the base of the glass bowl to drain off the fuel into the jar.
  5. Now undo the central retaining bolt that holds the glass bowl and filter in place, carefully separating these from the retaining bracket above. There are normally rubber O-ring type seals between the bracket, filter and bowl. New seals are normally supplied with filters – it is best to check when ordering.
  6. Clean all the parts, paying particular attention to all the contact surfaces
  7. Reassemble with the new parts, including the new seals, taking care not to over tighten the bolt securing the bowl, filter and bracket together – only moderate pressure is required. Smear some diesel on the seals to help them bed in properly.
  8. Open the fuel stopcock and check for leaks.

Secondary filter – also known as a fine filter, the secondary filter is needed to separate the extra fine particles in diesel fuel that could damage the injectors. It does not need replacing as often as a primary filter, normally manufacturers recommend doing this after 200 hours’ use. There are two main types of secondary filters: spin-on style where the filter is contained in a metal canister and cartridge type filters where only the filter medium is replaced.

diesel engine secondary fuel filter

The replacement procedure for a spin-on filter is as follows:

  1. Make sure the tank fuel stopcock is closed.
  2. Unscrew the filter a half turn using a filter wrench, pipe wrench or strap.
  3. Now hold a plastic bag around the filter and continue to undo it by hand, being aware that it will be full of fuel. Then dispose of it in the boatyard’s recycling containers.
  4. Replace the rubber seal, smearing a little diesel fuel on the new seal to help it bed in.
  5. Carefully pour some diesel fuel into the new filter. This will help make bleeding the fuel system quicker. Note, to prevent spillage do not attempt to do this with a primary filter as in my experience assembling the new filter, seals and glass bowl is tricky enough without the new filter having fuel in it.
  6. Screw on the new filter and hand tighten it only.
  7. Bleed the fuel system and check for leaks.

Diesel fuel system

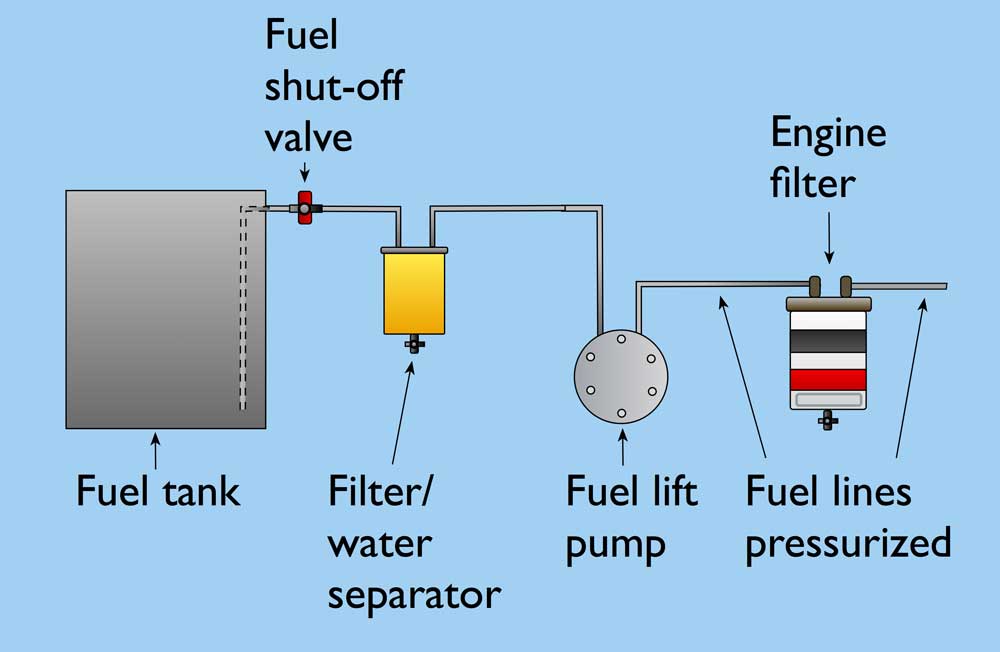
 Bleeding the fuel system

When you replace the fuel filters, air gets trapped in the fuel system. This also happens if you run out of fuel. When you try to start the engine the trapped air prevents the fuel from flowing properly, hence the engine will run badly and may not start at all. This happens because if air bubbles get into the injector pipes the injector valve does not operate. Some engines do not require this as they are self-bleeding, but many do. These are the steps to take to bleed a fuel system:

  1. Turn the fuel tank stopcock on.
  2. You need a container and rags to catch drips from the fuel system as you bleed it and a small screw driver and/or spanner as required. If in doubt you may need to consult the manual. Wearing protective gloves is also a good idea.
  3. Identify where the hand priming lever is on the fuel lift pump and where the bleed screws are on the filter bodies and injection pump. These can be a little tricky to find for the first time in a cramped engine bay.
  4. If the primary filter is at a lower level than the fuel in the tank undo the bleed screw. Note you do not need to unscrew it completely.
  5. Fuel with bubbles will begin to appear, so hold a container beneath the filter to catch the drips. When the fuel runs clear, close the bleed screw.
  6. Wipe the primary filter dry.
  7. Unscrew the bleed screw on top of the secondary filter.
  8. Operate the hand priming lever on the fuel lift pump. If the lever won’t move, this will most likely be because the engine will have stopped where the pump is at the end of its travel. Try turning the engine over a little either with the starter or by hand, then try the pump again.
  9. Keep working the priming lever until clear fuel comes out with no bubbles and then tighten the bleed screw.
  10. Wipe the secondary filter dry.
  11. At this point the system should be bled and the engine should start but if not the injection pump and high pressure line may need bleeding.
  12. Bleed the injection pump next, having located the upper bleed screw.
  13. The last parts to bleed but only if necessary are the injector pipes. By this point an extra pair of hands will be of help to operate the starter.
  14. To do this, slacken the pipe connectors that join the pipes to the injectors one by one, cranking the engine in short bursts and checking for fuel escaping from the unions. Take care as fuel escaping from the injection pipes will be under very high pressure.
  15. Finally re-tighten all the fittings through the system, shut off the fuel tank stopcock, wipe everything dry and dispose of any spilt fuel.

A final note on this. Some boat owners prefer to wait and bleed the fuel system when the boat is back in the water. This enables the engine to be run for a while and checked over with the cooling system operational.

Wooden Hull Repairs

While wooden boat hull maintenance is mostly straightforward, it is always a good idea to take expert advice on any repair job needed doing to a wooden boat, unless you have done the job before and know what you are doing.

Always have an emergency ditch bag ready to go…

An emergency ditch bag (also known as a grab bag, abandon ship bag, or go-bag) is a crucial piece of safety equipment for any vessel venturing out...

Keel maintenance and repair – Part 1

Keels are designed to act as underwater foils that generate lift as the boat moves through the water, counteracting the leeward force of the wind and enabling the boat to sail closer to the wind. Keel maintenance and repair is essential for the performance of your boat.

Steel and Aluminium Hulls

The two metals used for hull construction are steel and aluminium. These are both very strong materials and will last a long time as long as they are cared for, which primarily means protecting steel boats from rust and aluminium boats from electrolytic action.

First Aid Afloat – fish spine injury

First Aid Afloat - Here is what to do if somebody stands on a fish spine: • Check for dangers. Is it safe for you to enter...

Wooden Hulls – Part 2

It is important to ensure the essential hull maintenance of a wooden boat is done, even if you are paying others to look after your boat for you. The priority is to prevent rot from taking hold. The protective layers of paint and varnish over wood are far more critical than on GRP boats, where the topsides are painted more for cosmetic reasons.

How to ensure your boat is in proper working condition

In this article Eva Tucker from Volvo Penta presents a handy check list of all the things that you need to check regularly in order to make sure that your boat is in a seaworthy condition. Including maintenance, safety gear and electrical checks.

Boating Rules of the Road – International ColRegs

    International ColRegs Rule 7: Risk of Collision Anyone who is responsible for a vessel at sea, from the...

Pleasure craft safety equipment recommendations

Safety equipment is an important part of boat preparation and it is advisable for all pleasure craft skippers to check their vessel is...

Sail care and maintenance – Part 1

When thinking about the care, maintenance and repair of sails it helps to have some understanding of the properties of the ever growing range of modern sailcloth and the fibres they are made from, as opposed to the traditional canvas sails of the past.

Seized fixings and fastenings

Maintaining a boat can be a rewarding experience but at times it can also be frustrating. A prime example of this is when you come across a seized fixing or fastening that refuses to budge. Read our tips on how to release and fix them:

Peer to Peer yacht charter – How can you monetize your boat?

There is a growing trend in peer to peer yacht charter. How does it work? People already rent rooms, cars and bikes from one...

Essential boat engine checklist

Boat engine checklist Engine oil level check Even if you have checked it previously, confirming the engine oil level is up...

Essential Knots: Sheet bend

Essential Knots: Sheet bend Use: Joining two ropes together. A sheet bend is particularly useful for joining two ropes of different...

Common marine electrical problems

Most problems with marine electrical systems arise from four possible sources, a lack of maintenance, a poor standard of initial installation, insufficient battery capacity, or ineffective charging systems.
Water ingress is a frequent issue – salt water can corrode contacts very quickly. If connections are not scrupulously clean – or are loose – resistance will be increased, resulting in progressively reduced power.

Safety Equipment Checklist for Boats

Safety Equipment Checklist for Boats   Liferaft line attached The liferaft will not work unless the trigger line is...

Wooden Hulls – Part 1

Traditional wooden boats have a plank on frame construction, a centuries old boat building method that is still in use today. Variations of the traditional method include carvel, clinker and strip planking, which all relate to the way the planking is attached to the frame.

Essential Knots: Round turn and two half hitches

Essential Knots: Round turn and two half hitches Use: Tying a rope to a pole or a ring. Step 1. Pass the end around the object. Step 2....

Competent crew skills: arriving and leaving a berth

Skilled boat handling is needed when entering or leaving harbour. Crew tasks include preparing the mooring lines and fenders before docking and...

Tacking a sailing boat

Tacking is the sailing manoeuvre used to change a boat's direction through an oncoming wind. Tacking a sailing boat calls for the crew to work as a...

Sailing into a storm

Weather forecasting has become increasingly accurate, but despite this, I was caught out recently by a forecast that considerably underestimated the wind strengths and consequently was sailing single handed in to a Force 8 gale, which proved to be challenging!

How to read nautical charts

Whilst most sailors today rely on GPS to find their way at sea, nautical charts are a crucial tool for any sailor to navigate safely and effectively. Here is a reminder of some of the basic steps involved in reading a nautical chart:

Jester Challenge 2022 – Sailing single handed from Plymouth UK to the Azores: Part 9 – Around the Azores

Jester Challenge – A modern experiment in old-fashioned self-reliance, self sufficiency, and personal responsibility. This is the ninth of a 10-part post where solo sailor, Bernie Branfield, shares his first-hand account of his single-handed, 2022 Jester Challenge, from Plymouth, UK to the Azores, in his 26′ Invicta Mk2, Louisa.

Diesel engine winterisation

An inactive boat engine needs to be protected from corrosion during the winter, caused by the rising humidity levels through the cold months and the salty coastal air. This applies whether the boat is left afloat or hauled out over the winter. Read here about the two important stages of winterisaton for a diesel boat engine.

Cleaning & polishing gelcoat topsides

The gelcoat topsides of a GRP boat can be pampered and restored to their former glory relatively easily when it is ashore. Gelcoat is only a very thin outer layer of the hull, often less than 1mm thick, so you should avoid cleaning it with highly abrasive cleaners, or an-ything that could potentially damage its surface.