Sailing boat rigs need to be checked regularly to reduce the risk of rig failure at sea. In part one of Sail boat rig checks we run through a series of useful checks that owners and skippers can carry out.
Some boat owners inspect their rigs before every cruise, others two or three times a year – to a certain extent it depends on how much sailing the boat has done. Rig tensions should also be checked and adjusted on a regular basis. The mast manufacturer will recommend what they think is best, as will your local rigger.
Rig geometry
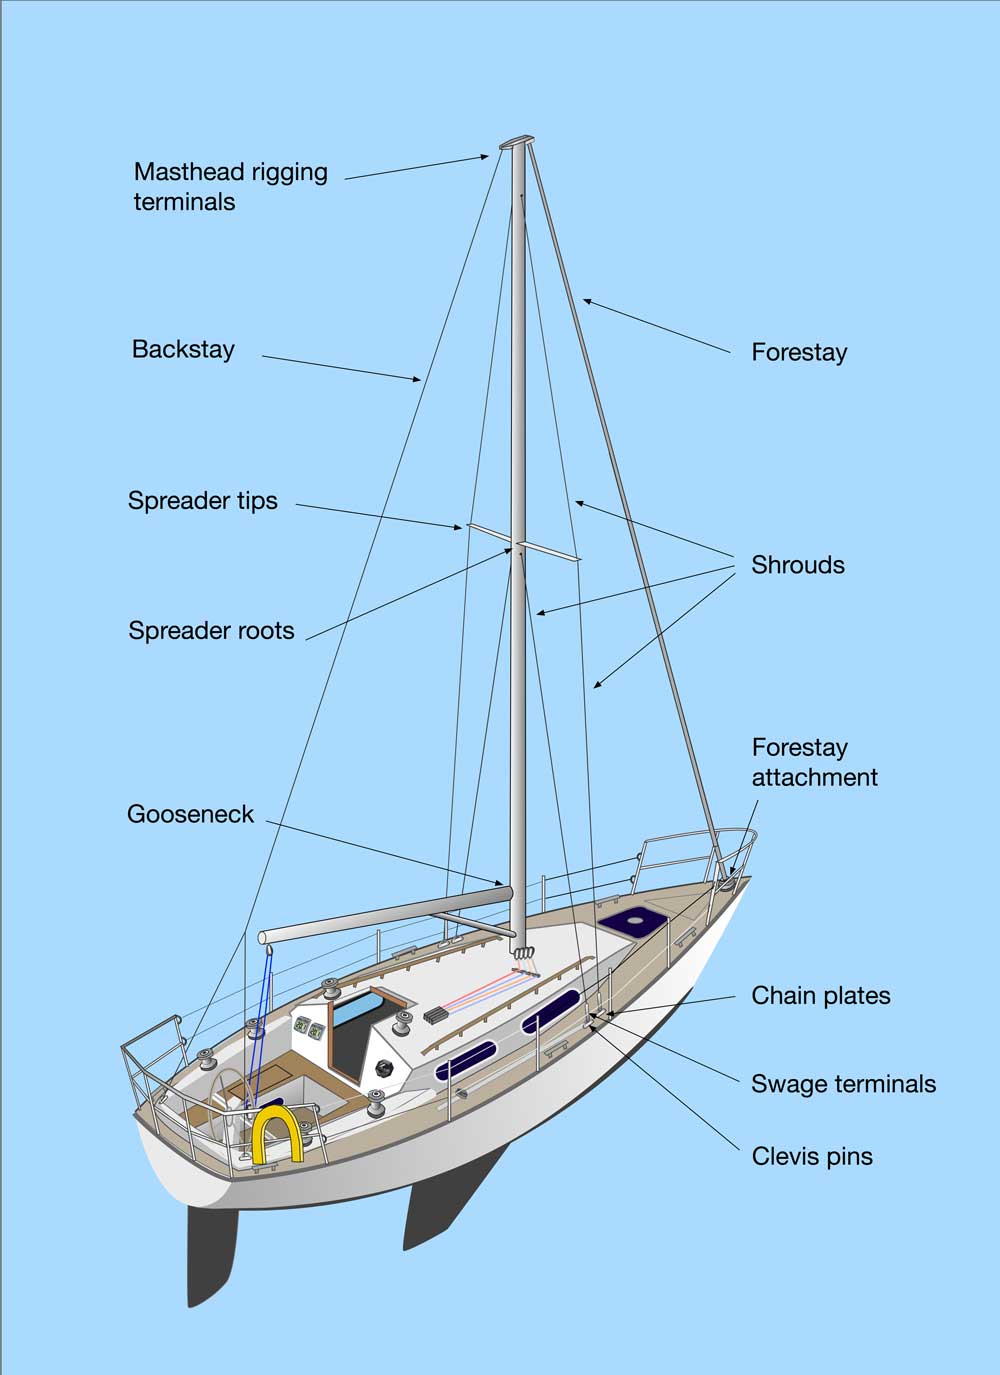
It is best to check over the whole rig with the mast stepped. Look around the rig from all angles to check the geometry is correct. This means standing back and checking the mast is straight, with no bends visible. The shrouds and stays should also be well balanced and feel roughly at the same tension. Check they are correctly aligned from the top swage to the chainplate at deck level to ensure that the loads on the rig are even.
Once you are satisfied with the overall geometry, you need to take a closer look at all the rig components. The easiest way to do this is with the mast down as you can detach the stays and shrouds for a thorough inspection. A magnifying glass is useful for this, to check for hairline cracks and pitting:
Chainplates
- Check for excessive wear on spacers or bushes, signs of elongation in pin holes, alignment with bottlescrews, stay angles, evidence of fracture at deck level.
- Check the condition of the chainplate fastenings to the hull below decks. Check for signs of leaking and crevice corrosion. The tiny cracks tend to occur horizontally due to a combination of stress and corrosion.
- Be aware that chainplates can fail because the structure that supports them rots due to water ingress in the deck core.
Deck check
- Check split pins, adequacy of threaded fittings, chafe or breakage of stranded wires, rig cracking, rust streaking, condition of mast collar sheaves.
- Check the mast foot of aluminium deck-stepped masts for signs of corrosion, cracks or movement. Also check halyard alignment and halyard chafe guards.
- Check the mast foot of aluminium keel-stepped masts for signs of corrosion caused by sea water in the bilges.
- Check for water and rot in wooden mast foots.
- Check the condition of running rigging lead blocks and their attachments.

Mast stay wires and mast fittings
- Check all the shrouds and stays for fraying, making sure there are no broken strands of wire, visible signs of cracking along swage sections, or signs of rust streaking.
- Check T-bar plates have retaining plugs or locking tabs, look for corrosion around mast tangs.
- Check fastenings are secure, that threaded fittings are sound and rigging screws are locked with split pins or seizing wire.
- Check wire terminals, toggles, extension links, rigging screws, shackles, clevis pins and split pins for wear, distortion or cracks.
Mast and boom – anodized
- Check all fittings and holes for cracks, fastening wear, deformation and corrosion.
- Check all welded fixtures for cracks around the welds.
- Check keel stepped masts for cracks and dents at deck level.
- Check genoa halyard leads if fitted for wear and replace if necessary.
- Check all moving parts are moving freely – sheaves, locking arms etc.
- Check for signs of corrosion, that split pins are protected to safeguard sails, all fastenings are securely riveted.
- Check the gooseneck pin has washers to protect it from vertical movement.
Mast and boom – painted
- Carry out the same checks as with an anodized mast and boom.
- Check for any damage to painted sections.
Mast and boom – wooden
- Check varnish or paint finishes for peeling, cracking and blistering.
- Check for areas of chafe.
- Check for signs of water ingress and rot damage around fasteners. Fasteners that are put under a lot of stress can crush the wood beneath, allowing water to penetrate and rot to start.
Spreaders
- Check for broken wire strands in the area where the spreader end is connected to the shroud.
- Check the spreader roots for any signs of cracks, movement or mast corrosion.
- Check for signs of cracking, fastenings secure, no signs of rust streaking, no chafe, no corrosion. Look out for covered spreader tips as they can trap water which leads to corrosion. Avoid putting too much tape around spreader tips as this tends to trap moisture.
- Check the condition of rubber pads if your spreaders have them.
- Check the spreaders are angled correctly, slightly upwards but never downwards. The reason for this is that when the shroud is under a heavy load it will pull the spreaders downwards and could pull the spreader base away from the mast completely, leading to rig failure.
- Also check that the spreaders bisect their shrouds.

Masthead
- Check the halyard sheaves rotate freely and are not worn, also the condition of the bushes and the split pins.
- Check that the halyard shackles are in good condition.
- Check the electrical wires are clamped correctly and are chafe free, the lights are operating.
- Check the VHF aerial wire is securely fastened and in good condition.
- Check the windex and wind gear are operating correctly.
- Check the forestay and backstay mounting holes for signs of wear or elongation.
Forestay (see also above: Mast stay wires and mast fittings)
- Check the roller furling headstay.
- Check halyard leads are at correct angle to swivel car, inspect halyards for wear on sheaves, fairleads and check swivel cars.
- Check for corrosion around mast tangs.
- Check the condition of threaded fittings.
- Check there are no broken strands of wire in the forestay.
Backstay (see also above: Mast stay wires and mast fittings)
- Check the condition of the backstay adjustment system.
Spinnaker pole ring
- Check the attachment points are secure.
- Check for signs of corrosion around mast tangs.
Insulators
- Check for sunlight degradation of plastic insulators.
Look out for Sail boat rig checks – part two where we discuss what a professional rig check entails and go through some useful rig maintenance tips.